It’s a given: blog articles attract more interest with photographs and other images. Hey, that’s one of the reasons I have a large photo at the top of every blog post.
When it became apparent that browsers would stop to read an article with an arresting image, it lead to an explosion of images on blogs, whether the subject matter of the photos matched the subject matter of the blog post, or not.
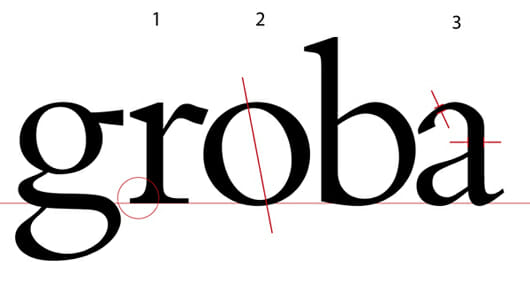
But there are lots of reasons to use images, and articles with images are often more educational as well as more entertaining. You can understand the essential elements of an oldstyle typeface, for instance, much more easily with an image like this, than without it:
Working with WordPress
Over the years you pick up a lot of little tricks and tips about blogging, and I’ve unearthed three things new bloggers often overlook, or simply don’t know about, that can help you when you want to put images on your blog.- Don’t forget your image SEO
When you upload images to use on your WordPress blog, you’ll use the Media information dialog. As an example, here’s the entry for an image from a recent blog post about print books and ebooks:

What’s important here is the Alternate Text field. This is where you can boost your image’s SEO (search image optimization), since this alternate text is placed into your blog post along with the image itself.
Pick your top keyword or two that are mentioned in the article and put them in this box, every time you upload a new image to your blog.
- Quickly size or scale your images
The main type column on my blog is 530 pixels wide, so I size my images to that measurement. Your blog is probably different. But what if you have an image that’s too wide? Sometimes you just don’t feel like firing up a big tool like Photoshop just to fix a little problem. Not to worry, with WordPress there are two quick ways to get your image right.
You can use the nifty WordPress graphics editor, which gives you basic tools for cropping, rotating, and flipping your image. Tucked in the corner is a handy resize function. It looks like this:

If you’re brave, just open up the HTML editor and take a look at the code for the image. You’ll see a section that indicates the width and height to display your image, and you can simply edit these values to scale the image even faster. Just remember that you need to maintain the same proportions or your image will be distorted. - Display images the way that makes sense
When WordPress drops an image into your blog, it links the displayed image to the original file. What this means is that if you click on the image, it will open, by itself, in a new browser tab or window. This also allows you to replace the link to the original file with a different link. For instance you can link the image of a book cover to a page where the book is for sale.
But you don’t have to accept the default way that WordPress drops these links into your post. You can change it in 2 easy ways.
If you want to put a smaller image on your blog but give readers the option to enlarge it for easier viewing, a much more elegant solution is avialable with plugins, and there are several that will do this job.
The one I use here is WP FancyZoom and it’s completely automatic.
Once you install the plugin, instead of the original image file opening in a new tab or window, it “zooms” open right in place. Want to try it? Click the image below:

But sometimes you don’t want the image to zoom or open in a new browser tab, you just want the image. Can you overcome the WordPress default? Sure, but you’ll need to tackle a little tiny bit of HTML.
Here’s what the code for an image looks like when it’s simply “inserted” by WordPress into your blog post:

The only part of this string that you really need in order for the photo to show up on your blog post is the part in black.
If you delete the parts in red (and yours is going to be much longer with more stuff between the “<" and ">” brackets that begin and end the code section) the image will be placed without any “cross reference” to the original file (indicated by the “a href” part of the code).

No comments:
Post a Comment